- Mise en forme JVCode
- Afficher les avatars
- Afficher les signatures
- Afficher les spoilers
- Miniatures Noelshack
- Accueil
- Actus
- Tests
- Vidéos
- Images
- Soluces
- Forum
Sujet : Mon sweet "Enhance visual W2"
C'est fait version finale de mon sweet sur mesure
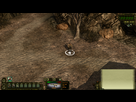
version normale:

version modifie:
Voila, maintenant je vais ENFIN (lol) pouvoir jouer!
Bon jeu a tous !
Joli, comment tu as fait pour avoir qu'un seul perso alors, tu as tué les autres ou tu as pu n'en créer qu'un ?
Ps: bonne chance ^^
tu peux en creer qu'un , le jeu ne t'oblige pas du tout a en faire 4
1,2,3 ou 4, c'est comme tu veux
surtout que je crois qu'apres tu peux enrôler des pnj qui te suivront et t'aideront a combattre ;)
Cool. Oui tu peux j'en ai déjà rencontré ![]()
Salut dakira76, tu pourrais nous donner un lien de téléchargement pour ton sweet.
Merci d'avance !
je te donne le sweet fx setting:
de plus tu mets saturation a zero et luminosite tres faible dans les options du jeu et surtout enlever l'antialiasing car elle enleve les details (cree un flou) et bizarement, c'est meme plus beau sans dans ce jeu
/*------------------------------------------------
-----------.
/ Choose effects /
'-------------------------------------------------
----------*/
// Set to 1 for ON or 0 for OFF
- define USE_SMAA_ANTIALIASING 1 //[0 or 1] SMAA Anti-aliasing : Smoothens jagged lines.
- define USE_LUMASHARPEN 1 //[0 or 1] LumaSharpen : Also sharpens the antialiased edges which makes them less smooth - I'm working on fixing that.
- define USE_BLOOM 0 //[0 or 1] Bloom : Makes bright lights bleed their light into their surroundings (relatively high performance cost)
- define USE_HDR 0 //[0 or 1] HDR : Not actual HDR - It just tries to mimic an HDR look (relatively high performance cost)
- define USE_TECHNICOLOR 0 //[0 or 1] TECHNICOLOR : Attempts to mimic the look of an old movie using the Technicolor three-strip color process (Techicolor Process 4)
- define USE_DPX 0 //[0 or 1] Cineon DPX : Should make the image look like it's been converted to DXP Cineon - basically it's another movie-like look similar to technicolor.
- define USE_LIFTGAMMAGAIN 0 //[0 or 1] Lift Gamma Gain : Adjust brightness and color of shadows, midtones and highlights (avoids clipping)
- define USE_TONEMAP 1 //[0 or 1] Tonemap : Adjust gamma, exposure, saturation, bleach and defog. (may cause clipping)
- define USE_VIBRANCE 1 //[0 or 1] Vibrance : Intelligently saturates (or desaturates if you use negative values) the pixels depending on their original saturation.
- define USE_CURVES 1 //[0 or 1] Curves : Contrast adjustments using S-curves.
- define USE_SEPIA 0 //[0 or 1] Sepia : Sepia tones the image.
- define USE_VIGNETTE 0 //[0 or 1] Vignette : Darkens the edges of the image to make it look more like it was shot with a camera lens. May cause banding artifacts.
- define USE_DITHER 0 //[0 or 1] Dither : Applies dithering to simulate more colors than your monitor can display. This lessens banding artifacts (mostly caused by Vignette)
- define USE_SPLITSCREEN 0 //[0 or 1] Splitscreen : Enables the before-and-after splitscreen comparison mode.
/*------------------------------------------------
-----------.
/ SMAA Anti-aliasing settings /
'-------------------------------------------------
----------*/
- define SMAA_THRESHOLD 0.05 // [0.05 to 0.20] Edge detection threshold
- define SMAA_MAX_SEARCH_STEPS 5 // [0 to 98] Determines the radius SMAA will search for aliased edges
- define SMAA_MAX_SEARCH_STEPS_DIAG 5 // [0 to 16] Determines the radius SMAA will search for diagonal aliased edges
- define SMAA_CORNER_ROUNDING 5 // [0 to 100] Determines the percent of antialiasing to apply to corners.
// -- Advanced SMAA settings --
- define COLOR_EDGE_DETECTION 0 // [0 or 1] 1 Enables color edge detection (slower but slightly more acurate) - 0 uses luma edge detection (faster)
- define SMAA_DIRECTX9_LINEAR_BLEND 0 // [0 or 1] Using DX9 HARDWARE? (software version doesn't matter) if so this needs to be 1 - If not, leave it at 0.
/*------------------------------------------------
-----------.
/ LumaSharpen settings /
'-------------------------------------------------
----------*/
// -- Sharpening --
- define sharp_strength 2.00 // [0.10 to 3.00] Strength of the sharpening
- define sharp_clamp 0.10 // [0.000 to 1.000] Limits maximum amount of sharpening a pixel recieves - Default is 0.035
// -- Advanced sharpening settings --
- define pattern 2 // [1|2|3|4] Choose a sample pattern. 1 = Fast, 2 = Normal, 3 = Wider, 4 = Pyramid shaped.
- define offset_bias 1.25 // [0.0 to 6.0] Offset bias adjusts the radius of the sampling pattern.
// I designed the pattern for offset_bias 1.0, but feel free to experiment.
// -- Debug sharpening settings --
- define show_sharpen 0 // [0 or 1] Visualize the strength of the sharpen (multiplied by 4 to see it better)
/*------------------------------------------------
-----------.
/ Bloom settings /
'-------------------------------------------------
----------*/
- define BloomThreshold 20.25 //[0.00 to 50.00] Threshold for what is a bright light (that causes bloom) and what isn't.
- define BloomPower 1.446 //[0.0000 to 8.0000] Strength of the bloom
- define BloomWidth 0.0142 //[0.0000 to 1.0000] Width of the bloom
/*------------------------------------------------
-----------.
/ HDR settings /
'-------------------------------------------------
----------*/
- define HDRPower 1.30 //[0.0 to 8.0] Strangely lowering this makes the image brighter
- define radius2 0.87 //[0.0 to 8.0] Raising this seems to make the effect stronger and also brighter
/*------------------------------------------------
-----------.
/ TECHNICOLOR settings /
'-------------------------------------------------
----------*/
- define TechniAmount 0.01 //[0.0 to 1.0]
- define TechniPower 3.8 //[0.0 to 8.0]
- define redNegativeAmount 0.50 //[0.0 to 1.0]
- define greenNegativeAmount 0.75 //[0.0 to 1.0]
- define blueNegativeAmount 0.90 //[0.0 to 1.0]
/*------------------------------------------------
-----------.
/ Cineon DPX settings /
'-------------------------------------------------
----------*/
- define Red 8.0 //[1.0 to 15.0]
- define Green 8.0 //[1.0 to 15.0]
- define Blue 8.0 //[1.0 to 15.0]
- define ColorGamma 2.5 //[0.1 to 2.5] Adjusts the colorfulness of the effect in a manner similar to Vibrance. 1.0 is neutral.
- define DPXSaturation 3.0 //[0.0 to 8.0] Adjust saturation of the effect. 1.0 is neutral.
- define RedC 0.36 //[0.6 to 0.2]
- define GreenC 0.36 //[0.6 to 0.2]
- define BlueC 0.34 //[0.6 to 0.2]
- define Blend 0.2 //[0.0 to 0.1] How strong the effect should be.
(suite et fin)
/*------------------------------------------------
-----------.
/ Lift Gamma Gain settings /
'-------------------------------------------------
----------*/
- define RGB_Lift float3(1.000, 1.000, 1.000) //[0.000 to 2.000] Adjust shadows for Red, Green and Blue
- define RGB_Gamma float3(1.000, 1.000, 1.000) //[0.000 to 2.000] Adjust midtones for Red, Green and Blue
- define RGB_Gain float3(1.000, 1.000, 1.000) //[0.000 to 2.000] Adjust highlights for Red, Green and Blue
/*------------------------------------------------
-----------.
/ Tonemap settings /
'-------------------------------------------------
----------*/
- define Gamma 1.05 //[0.00 to 2.00] Adjust midtones
- define Exposure 0.01 //[-1.00 to 1.00] Adjust exposure
- define Saturation 0.25 //[-1.00 to 1.00] Adjust saturation
- define Bleach -0.01 //[0.00 to 1.00] Brightens the shadows and fades the colors
- define Defog 0.005 //[0.00 to 1.00] How much of the color tint to remove
- define FogColor float3(0.00, 0.00, 2.55) //[0.00 to 1.00, 0.00 to 1.00, 0.00 to 1.00] What color to remove - default is blue
/*------------------------------------------------
-----------.
/ Vibrance settings /
'-------------------------------------------------
----------*/
- define Vibrance 0.20 //[-1.0 to 1.0] Intelligently saturates (or desaturates if you use negative values) the pixels depending on their original saturation.
/*------------------------------------------------
-----------.
/ Curves settings /
'-------------------------------------------------
----------*/
- define Curves_contrast 0.60 //[-1.0 to 1.0] The amount of contrast you want
// -- Advanced curve settings --
- define Curves_formula 2 //[1|2|3|4|5|6|7] The constrast s-curve you want to use.
/*------------------------------------------------
-----------.
/ Sepia settings /
'-------------------------------------------------
----------*/
- define ColorTone float3(1.40, 1.10, 0.90) //[0.00 to 1.00, 0.00 to 1.00, 0.00 to 1.00] What color to tint the image
- define GreyPower 0.11 //[0.0 to 1.0] How much desaturate the image before tinting it
- define SepiaPower 0.58 //[0.0 to 1.0] How much to tint the image
/*------------------------------------------------
-----------.
/ Vignette settings /
'-------------------------------------------------
----------*/
- define VignetteRadius 1.00 //[-1.00 to 3.00] lower values = stronger radial effect from center
- define VignetteAmount -1.00 //[-2.00 to 1.00] Strength of black. -2.00 = Max Black, 1.00 = Max White.
- define VignetteSlope 8 //[1 to 16] How far away from the center the change should start to really grow strong (odd numbers cause a larger fps drop than even numbers)
- define VignetteCenter float2(0.500, 0.500) //[0.00 to 1.00] Center of effect.
/*------------------------------------------------
-----------.
/ Dither settings /
'-------------------------------------------------
----------*/
//No settings yet, beyond switching it on or off in the top section.
//Note that the checkerboard pattern used by Dither, makes an image harder to compress.
//This can make your screenshots and video recordings take up more space.
/*------------------------------------------------
-----------.
/ Splitscreen settings /
'-------------------------------------------------
----------*/
- define splitscreen_mode 3 //[1|2|3|4|5] 1 = Vertical 50/50 split, 2 = Vertical 25/50/25 split, 3 = Vertical 50/50 angled split, 4 = Horizontal 50/50 split, 5 = Horizontal 25/50/25 split
Salut et merci pour la config de ton sweetfx. ![]()
Mais pourrais tu détailler la façon dont tu l'as installé ( quelle version, etc..) ?
Parce que d'habitude j'arrive à activer sweetfx ( en plaçant tout le bazar dans le dossier ou il y a l'exe du jeu ) et sur celui là ça ne fonctionne pas ( pc sous windows 7 ). ![]()
Ah, j'oubliais, j'ai aussi tenté de rajouter -force-d3d9 au raccourci et...rien...
Salut benjouille! ;)
J'ai cree un autre post pour ca
je te passe le lien :
https://www.jeuxvideo.com/forums/1-28319-4447-1-0-1-0-davil-enhance-visual-w2-le-lien.htm
et bien heureux que cela te plaise
merci ;)
Oh merci j'avais pas vu ce sujet ![]()
En fait j'avais déjà téléchargé ton preset sur le site sweetfx...enfin bon, je vais réessayer de l'installer..j'ai peut-être zappé un truc... ![]()
T'as aussi telecharger l'explication?
Oui, oui j'ai pas oublié de regarder l'explication ^^
Je t'ai répondu en mp...
Lu all,
C'est vrai que c'est plus joli. Ce que je ne comprends pas quand même, c'est pk les devs ne le font pas eux même, je ne connais rien en programmation mais à première vue ça ne prend pas tant de temps que ça?
Ah je pensais tomber sur un mec qui montrait son sweet (le vetement ) ![]()
enfin bref pas taper !!
Si j'ai bien suivi
le premier lien est le jeu sans modif et le 2eme lien est suite a la modif que tu as faite (l'auteur) ?
Sweet fx est un logiciel a télécharger en plus ?
En tout cas c'est super beau Oo
Un ptit tuto guide pour bien placer Sweet FX au bon endroit par exemple ??
Je suis sur Steam déjà .. pas sur que ça fonctionne et pas sûr non plus que Sweet Fx sois bien placé ![]()
J'ai trouvé comment le faire fonctionner chez moi...
Bon par contre , j'ai "tout" placé dans le fichier "build" ( là ou il y a "WL2.exe" ).
Puis j'ai du "simplement" créer un nouveau raccourci de "WL2.exe" , puis Clic droit sur le raccourci WL2.exe / propriété / raccourci et à la fin de "Cible" ( avec un espace ) écrire " -force-d3d9 " ( comme l'avait indiqué dakira...).
Exemple : "E:\JEUX\Wasteland 2\Build\WL2.exe" -force-d3d9
Astuce trouvé ici : http://sfx.thelazy.net/games/preset/2130/
Merci encore dakira, c'est très sympa de prendre le temps d'aider les autres ^^
Moi aussi je vais enfin pouvoir tester la "bête" :p
Gestion du forum
Sujets à ne pas manquer
- Aucun sujet à ne pas manquer